

2.2.7.4 Slash and Spread Method
The sloper or block pattern has to be traced on a separate paper for moving the darts in front and the back bodice using the slash and spread method and the pivot points on the back bodice have to be marked as well (Cooklin 1999; Crawford 2005; Gupta et al. 2006). The factors that need to be considered during the slash and spread method are given below.
- • The slash should always be made along the lower line of the horizontal darts.
- • For vertical darts, the slash needs to be made along the line nearer to the center front or center back.
- • Make all the slashes go to but not through the pivot point. Front Bodice. The steps involved in creation of a dart in the front bodice using the slash and spread method are shown in Figure 2.14.
- • Take the front bodice pattern. • Locate the pivot point on the front bodice.
- • Label the dart legs as AB. • Mark the position of the new dart point C at the neckline to which the dart needs to be shifted as indicated in Figure 2.14.
- • Draw a slash line from point C to the bust point. • Slash along the line marked from point C to the bust point but not through the bust point.
- • Similarly, slash along line B to the bust point but not through the bust point as shown in the figure.
- • Close the dart AB by overlapping the dart legs. • Trace this on another sheet of paper. • You would now find an opening at point C. • Mark the opening as DE.
- • Mark the center line as F.
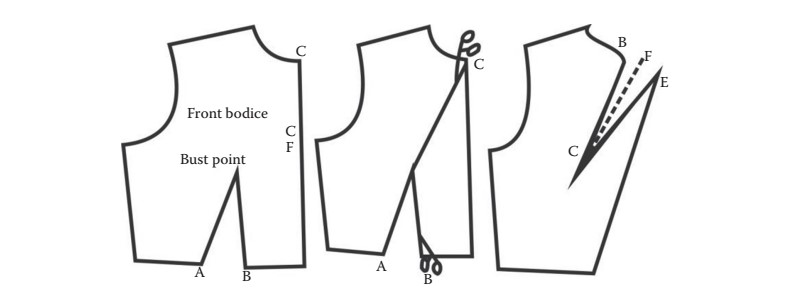
FIGURE 2.14
Slash and spread method for front bodice.
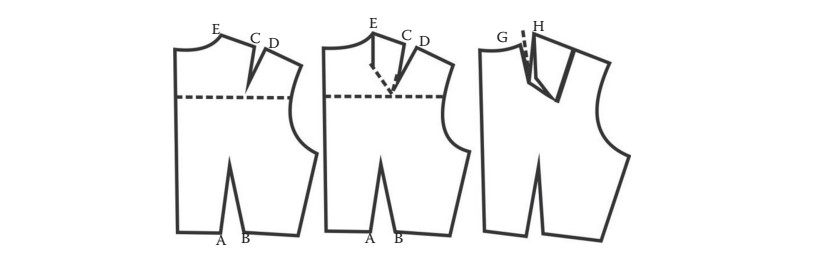
FIGURE 2.15
slash and spread method for back bodice.
- • A line has to be drawn toward the bust point and then the dart legs are drawn.
- • Locate a point G 1/2″ above the bust point and redraw the dart legs.
Back Bodice. The steps involved in shifting of the shoulder dart of the back bodice to any part of the seam line in the upper portion of the pattern are shown in Figure 2.15.
- • The shoulder dart of the bodice back may be shifted.
- • The back bodice paper pattern is prepared and the pivot point is marked.
- • Mark the dart legs at the waistline as AB and at the shoulder as CD – the dart to be moved.
- • Mark the position to which the dart needs to be shifted as point E at the neckline.
- • A line is drawn at the point E to indicate the full length of the new dart. The line is extended to the pivot point and indicated as a dotted line.
- • Cuts are made from the shoulder dart to the pivot point and along the new dart line to the pivot point.
- • The shoulder dart is closed and pinned. The neckline opening is filled for the new dart by pinning the pattern to another piece of pattern.
- • A dotted line is drawn to indicate the center of the new dart. The new dart can be parallel to the center back or it could be a slant line from the center.
- • The new dart lines, that is, GH is drawn in such a way that the length of the new dart coincides with the original shoulder dart.