

2.2.5.2 Basic Sleeve Pattern (Figure 2.6)
In Figure 2.6, AD is on fold and is equal to sleeve length. AB = 1/4 bust – 1/4″ (for adults, this was 1/4 bust – 1½″). Mark BE = 1/2 AB and DF = 1/2 lower arm + 1/4″. Connect AE. Divide it into four equal parts and mark a, b, c. Mark CG = 1/2″, BF = 1/4″, AE = 1/4″ and AD – 1/2″. Connect AGFE (back armscye line) and AGBDE (front armscye line).
2.2.6 Pattern Draping
Pattern draping is otherwise known as toiling or modeling. Pattern draping is the manipulation of two-dimensional fabrics on a three-dimensional torso or body form to get a perfect fit. The dress form generally used for draping is a muslin padded dress form, positioned in an adjustable stand that duplicates the human body structure. The dress form should be firm, yet resilient
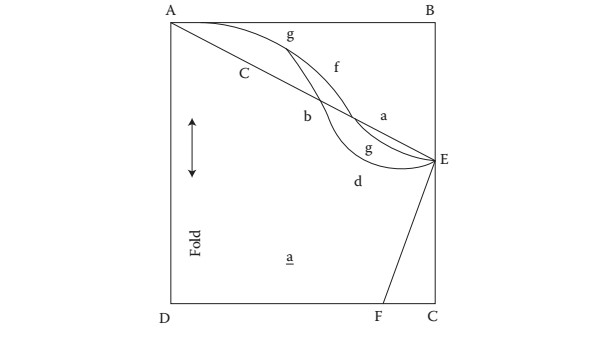
FIGURE 2.6
Pattern drafting of sleeve.
and should not resist pins (Aldrich 2002, 2004, 2009; Anon 2015). A range of dress forms exist in standard sizes for children’s and men’s figures. The steps for the preparation of a dress form are given below.
1. The dummy should be checked for both bust and hip measurement.
2. It should be padded to get the required measurement by using high density foam. The foam is adjusted in such a way that it assumes the shape of the human breast.
3. A square piece of quilt batting is pinned onto the formed breast. While pinning the batting, care is taken to see that it is slightly larger than the required size at the sides. When it is covered with muslin, it gets compressed to the right size and looks more natural.
4. Batting should be done equally on both sides.
2.2.6.1 Draping an Adhesive Paper Dress Form
Since it is hard for a person to fit him or herself for a long time, a dress form – a duplicate of the figure – is essential (Cooklin 1999; Crawford 2005; Ashdow 2007). One that is made on the individual is more adequate and less costly than a commercially made form.
2.2.6.1.1 Materials Needed
- • Two shirts of thin knitted fabric like a T-shirt.
- • Thin muslin fabric which is cut in the bias direction or a dress form kit, which will contain all the required material.
- • Medium weight 1″ wide adhesive papers.
- • Coloured scotch tape, two sponges, two small basins for water, needle, thread, sharp scissors, pencil, rule, tapeline, and a sharp razor blade.
2.2.6.1.2 Method of Draping
Generally four persons are required to build the body form quickly. Two persons are needed for moistening the cloth strips and two persons for pasting the fabric strips to a person who should wear a tight garment which gives the needed style lines. All strips should be cut prior to creating the form on the person concerned (Yarwood 1978; Armstrong 2006; Anon 2015). The various steps in the pattern draping method are shown in Figure 2.7.
a. The figure shows the depth that each group of strips is cut from the two rolls. Each batch should be labelled as it is cut.
1. The first batch of strips has to be cut 3/4″ from outside of both fabric rolls and is roughly 15–12″ long. These fabrics are used for draping from shoulder to waist on the first layer, and on bias manner from the neck down front and back on the second layer.
2. The second batch of fabric strips of about 12–9″ has to be cut 3/4″ from outside of each roll. These strips are utilised for draping on the first layer from waist to hip (lower edge) as well as on the second layer down from the neck in front and back.
3. The third batch of strips of about 9–5″ has to be cut 3/4″ from the outside edge of the roll.
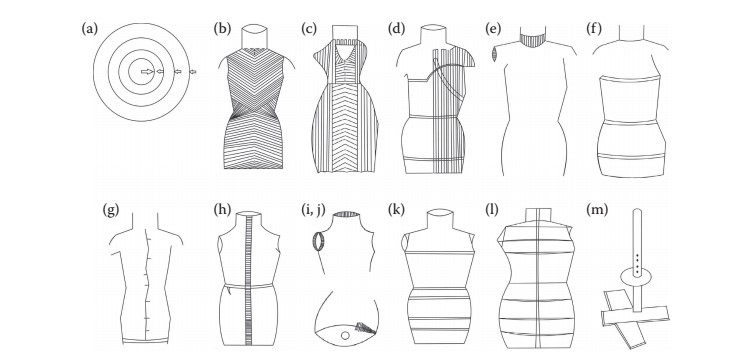
FIGURE 2.7
Draping in adhesive paper dress form.
4. About 250 of 3″ strips have to be cut for finishing edges of the form and for joining the two sections.
b. The shirt has to be put on the person concerned and then the edges are sewn together; hence, it will fit firmly on the figure. Afterward, the shirt has to be pulled down from the shoulder line and a strip of moistened tape should be pasted carefully around the waistline. Another strip of tape has to be pasted below the widest hip and under each bust to maintain contour.
c. The first layer of strips, which is about 12–15″, has to be pasted on the figure from neck and shoulder edges to taped waistline, overlapping 3/4″ of the width of the strip. Further pasting of strips has to be done for the armscye edge and overlapping of strips at the top of the shoulder. The same method has to be repeated for another side of the front and back. After pasting the strip at right angles to the waist, the tape ends should be joined to those above the waist and another strip of about 5–9″ in bias way from underarm to lower hip edge. The procedure has to be repeated for the other side also.
d. For pasting the second layer of tape, strips of about 9–12″ have to be used. Starting from below the neck, the strips have to be pasted in the bias way across the front, alternating strips from the right and left side. The crossed strips should be continued down the body to lower hip line edge, using strips of about 12–15″ below the waistline. The second layer of strips from the underarm to the hipline should be reinforced with strips of about 5–9″ in a similar manner as in c.
e. The armscye area should be strengthened to form a good structure by using strips of about 3–5″. The neck area has to be finished with a layer of strips about 5–9″ around the neck to maintain a good shape.
f. Before removing the neck, bust and waist, measurement have to be taken from the floor up to 2 or 3″ below the widest hip and it is marked at the base of the form.
g. Centre front and back with ruled line and across the front and back have to be marked before removing the form from the person, for matching when joining the half sectional. The difference between the person with and without form at the neck, bust, waist and hip has to be noted and necessary calculations have to be done. Then the form has to be cut along the hipline which is parallel to the floor.
h. Both sections are joined using strips of about 3″ wide in front as well as back.
i. The neck and armscye edges have to be trimmed and reinforced with 3″ strips around the cut edge.
j. The bottom of the form has to be trimmed until it stands evenly on the table. Cardboard has to be cut from paper patterns and a 1¼″ hole in the centre also has to be cut. Then the cardboard flush is fitted onto the inside edges of the hip and neck and joined to the form with 3″ strips.
k. and l. Outer covering – The form should be shellacked and dried to avoid curling of paper. A top shirt should be tightly and smoothly fitted over the form, and sewing can be done wherever necessary. The taping should be done at the armscye, neck and under the lower edge of the form.
m. A stand made of two 2 × 4 × 18″ pieces of wood for a base, and a pole 5–5½′ tall and 1¼″ in diameter with nail holes bored up the length to adjust the height can be used to keep the form.